How to read humidity & temperature data using a DHT11 sensor in ESP32 through ESP-IDF?

Full-Stack Software Engineer having 10Yrs of industrial experience in developing large scale web/mobile applications. Nowadays, offering my expertise from my couch.
On off days I love to travel, meet new people & capture the beauty of this world.
This post may contain affiliate links, which means I may receive a commission for purchases made through links. I will only recommend products I have personally used or thoroughly researched and believe can provide value to you.
In this project, we’ll learn how to fetch humidity & temperature data from a DHT11 sensor in ESP32 with IDF framework.
Parts Required:
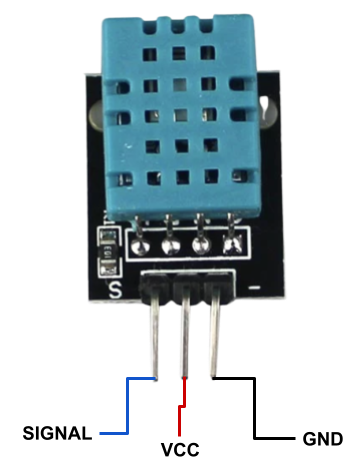
DHT11 (Humidity & temperature sensor):
It’s a basic, ultra-low-cost digital humidity and temperature sensor. The sensor can measure temperature from 0°C to 50°C and humidity from 20% to 90% with an accuracy of ±1°C and ±1%.
PIN Configuration:
| No | Pin Name | Description |
| 1 | Vcc | Power supply 3.5V to 5.5V |
| 2 | Data | Outputs both temperature and humidity data through serial data |
| 3 | Ground | Connected to the ground of the circuit |
DHT11 Specifications:
Operating Voltage: 3.5V to 5.5V
Operating current: 0.3mA (measuring) 60uA (standby)
Output: Serial data
Temperature Range: 0°C to 50°C
Humidity Range: 20% to 90%
Resolution: Temperature and Humidity both are 16-bit
Accuracy: ±1°C and ±1%
To know more about DHT11, you can check their datasheet from the following link - https://components101.com/sites/default/files/component_datasheet/DHT11-Temperature-Sensor.pdf
Schematic Diagram for ESP32 connection with DHT11 Sensor:
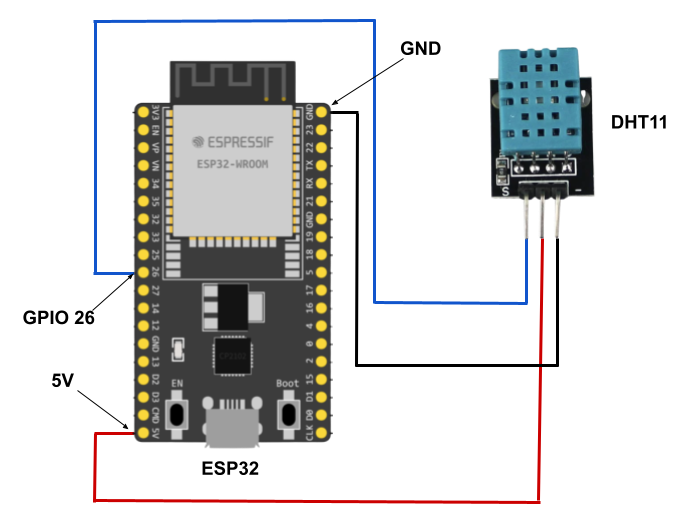
STEPS of Wiring:
As shown in the above schematic dig(fig-1.0), we need to connect the signal pin of DHT11 with any of the GPIO PINs of ESP32. Here, we’ve used the GPIO 26 pin of ESP32.
The VCC pin of DHT11 needs to connect with the 5V PIN of ESP32.
Finally, the GND PIN of DHT11 needs to connect with one of the GND PIN of ESP32.
Connect the ESP32 to your computer system.
After finishing all the above wiring, we need to install the library for DHT11 in our project. So that we can make the required communication between ESP32 & DHT11 sensor. To do this, we’ll use the following ESP-IDF Components library. To install the library, follow the doc as it has mentioned in the documentation.
Link for ESP-IDF Components library: https://esp-idf-lib.readthedocs.io/en/latest/
Source Code:
Now, it's time to jump on our editor to write code for pulling the sensor information to our system console. I hope you've already made the necessary setup & configured the IDF with your editor. If not, then you can follow the below official doc & set it up quickly.
Official doc for ESP-IDF: https://docs.espressif.com/projects/esp-idf/en/latest/esp32/get-started/index.html#installation
Here is the following piece of "C" code, which you can paste into your "main.c" file & flash the whole project to your ESP32.
#include <stdio.h>
#include <freertos/FreeRTOS.h>
#include <freertos/task.h>
#include <dht.h>

#define SENSOR_TYPE DHT_TYPE_DHT11
#define DHT_GPIO_PIN GPIO_NUM_26

void dht_test(void *pvParameters)
{
    float temperature, humidity;

    while (1)
    {
        if (dht_read_float_data(SENSOR_TYPE, DHT_GPIO_PIN, &humidity, &temperature) == ESP_OK)
            printf("Humidity: %.1f%% Temp: %.1fC\n", humidity, temperature);
        else
            printf("Could not read data from sensor\n");

        vTaskDelay(pdMS_TO_TICKS(2000));
    }
}

void app_main(void)
{
    xTaskCreate(dht_test, "dht_test", configMINIMAL_STACK_SIZE * 3, NULL, 5, NULL);
}
Github link of above code: https://gist.github.com/mi6crazyheart/d5da57df382067e5273a08f1a622e3dd
The whole code is self-explanatory. Primarily, It has four sections.
Header files
Define constant
dht_test() function
app_main() function
Header files
#include <stdio.h>
#include <freertos/FreeRTOS.h>
#include <freertos/task.h>
#include <dht.h>
Besides our standard "stdio.h", here we've included "FreeRTOS" & "dht.h". "FreeRTOS" for pulling the real-time sensor data from DHT11 using task & "dht.h" for connecting ESP32 & DHT11.
Define constant
#define SENSOR_TYPE DHT_TYPE_DHT11
#define DHT_GPIO_PIN GPIO_NUM_26
Here, we've defined two constants. One is for "SENSOR TYPE", where we are passing the ENUM value for the DHT11 sensor & another one is for "DHT_GPIO_PIN", where we are passing the ESP32 GPIO PIN.
dht_test() function
void dht_test(void *pvParameters)
{
    float temperature, humidity;

    while (1)
    {
        if (dht_read_float_data(SENSOR_TYPE, DHT_GPIO_PIN, &humidity, &temperature) == ESP_OK)
            printf("Humidity: %.1f%% Temp: %.1fC\n", humidity, temperature);
        else
            printf("Could not read data from sensor\n");

        vTaskDelay(pdMS_TO_TICKS(2000));
    }
}
In this function, we constantly try to fetch sensor data from the "dht11" sensor every 2 seconds.
app_main() function
void app_main(void)
{
    xTaskCreate(dht_test, "dht_test", configMINIMAL_STACK_SIZE * 3, NULL, 5, NULL);
}
This is the main entry point for our program. Here, we create a FreeRTOS task inside, which we've called the "dht_test()" function to run the functionality.
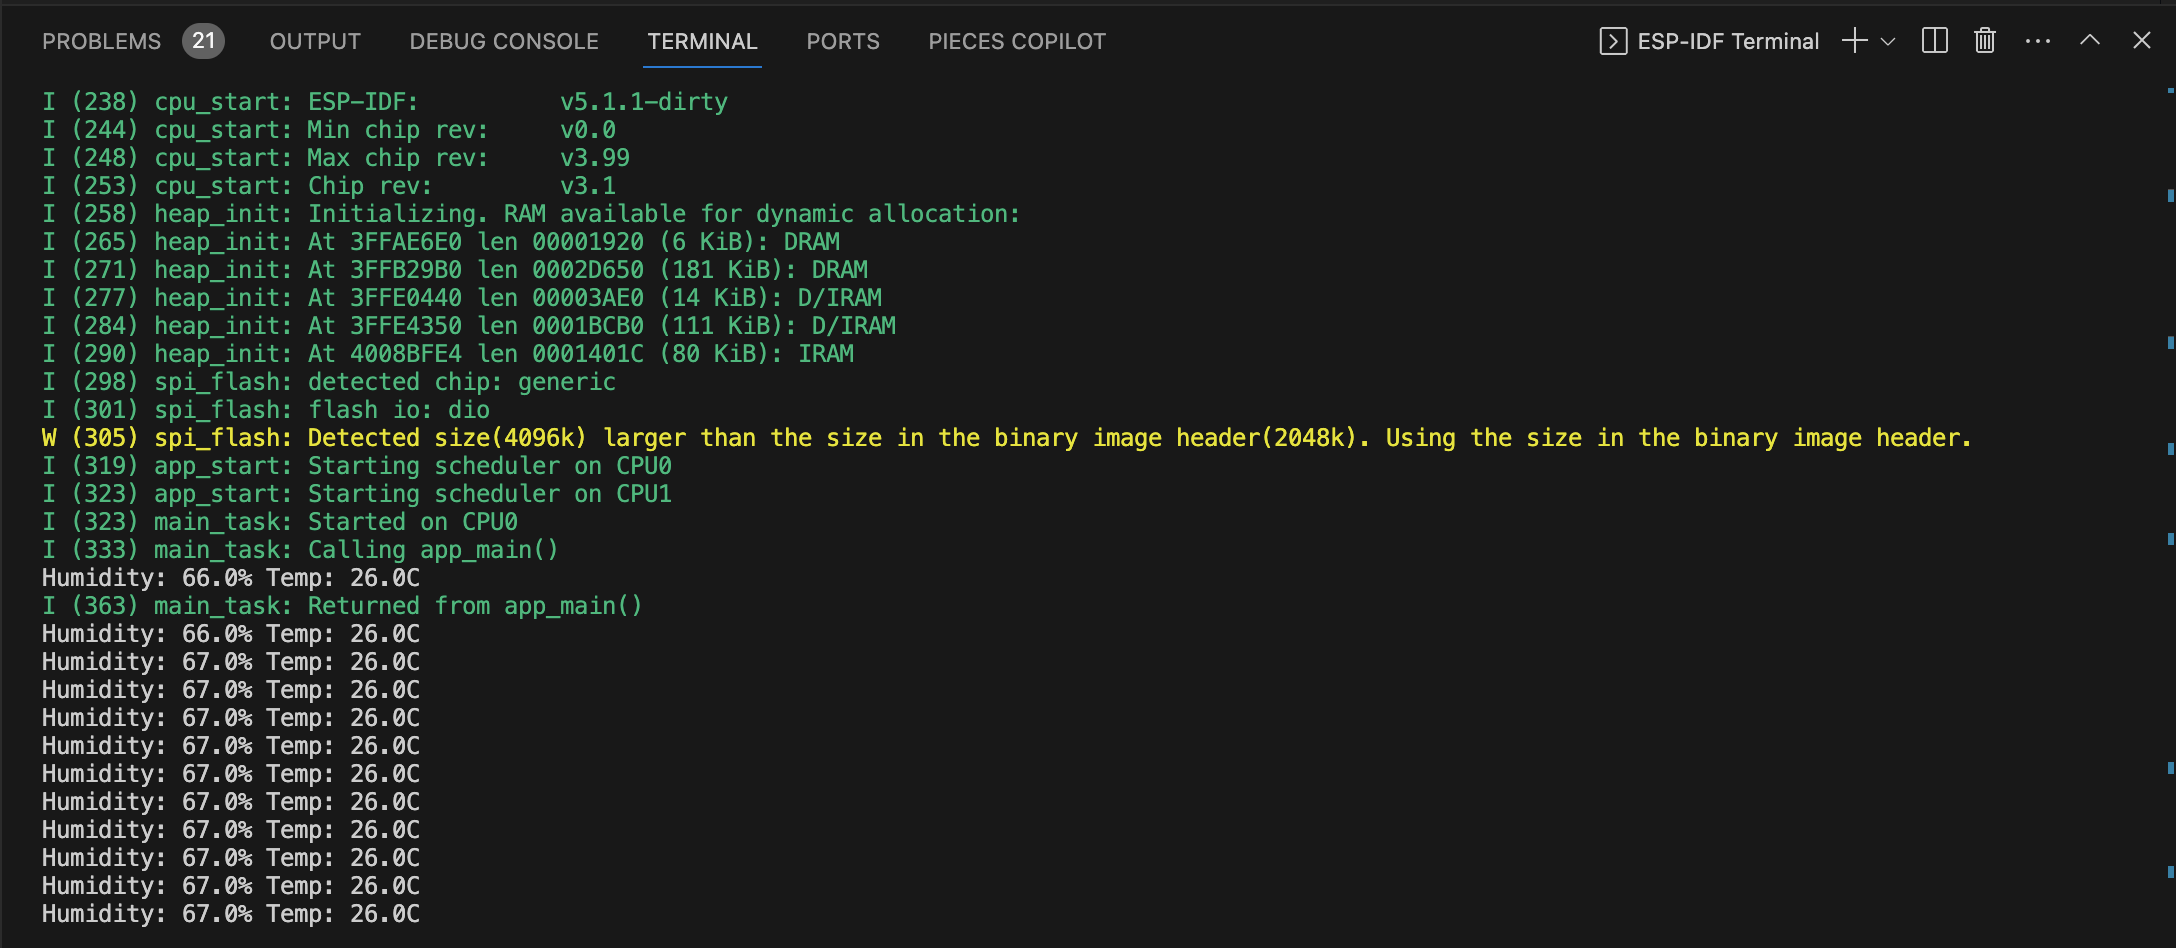
That’s it. Now, to flash all codes to our ESP32 board, we just need to run the following command -
idf.py flash monitor
If everything works fine, you’ll get the sensor information in your console.
Example:
Watch the video tutorial of this blog -
I hope this small piece of info will help you with enough clues on how to work with ESP32 & DHT11 sensors in the ESP-IDF development environment.


